OPNSense
- HAProxy Simple Configuration for local webserver
- Adguard Home communications error to 127.0.0.1#53: connection refused
- Disable IPv6 in OPNSense
- How to enable the HAProxy statistics page in OPNsense
- HowTo Restore a Google Drive backup file in OPNsense
- Run frequent Speedtest in OPNsense
- Voorgestelde waarden voor Advanced tab in Unbound
- Setup os-ddclient for when external IP address changes
HAProxy Simple Configuration for local webserver
Parameters for this setup
Local webserver is on ip address 192.168.1.200 and uses port 80
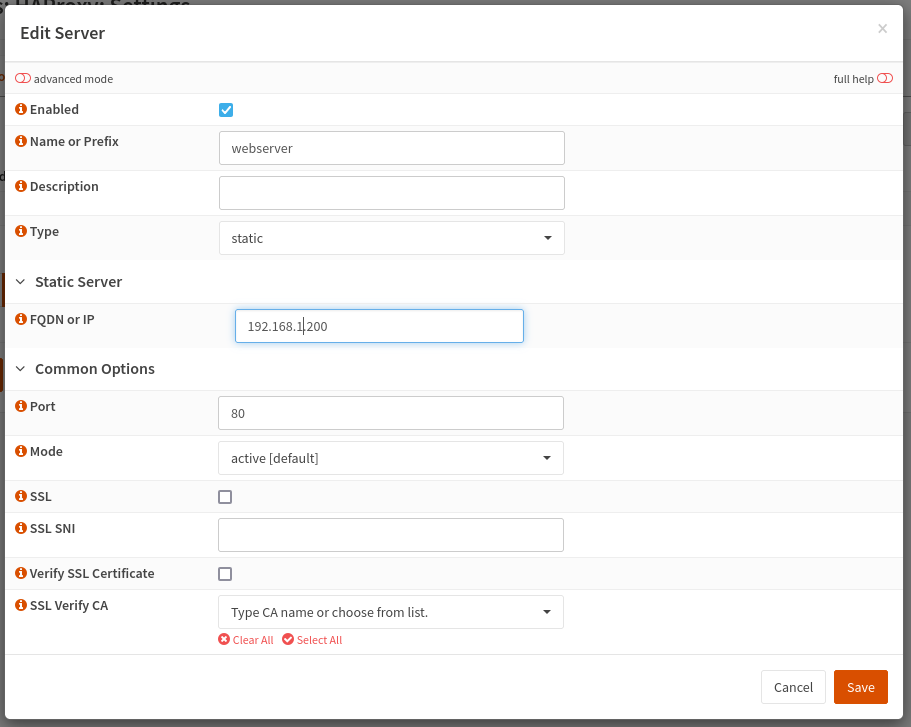
Step 1: Define a Real server
- Name: anything you like to recognize the webserver
- IP address: The IP address of the internal webserver e.g. 192.168.1.200
- Port: 80
- SSL: disable
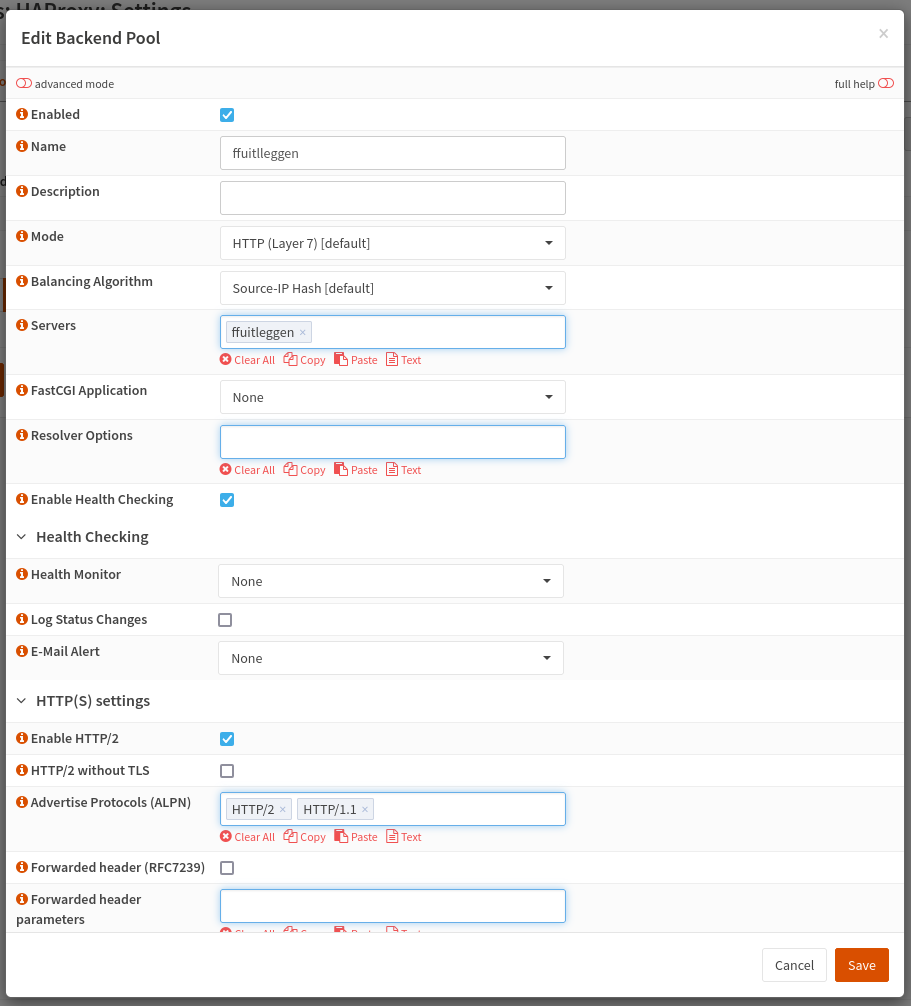
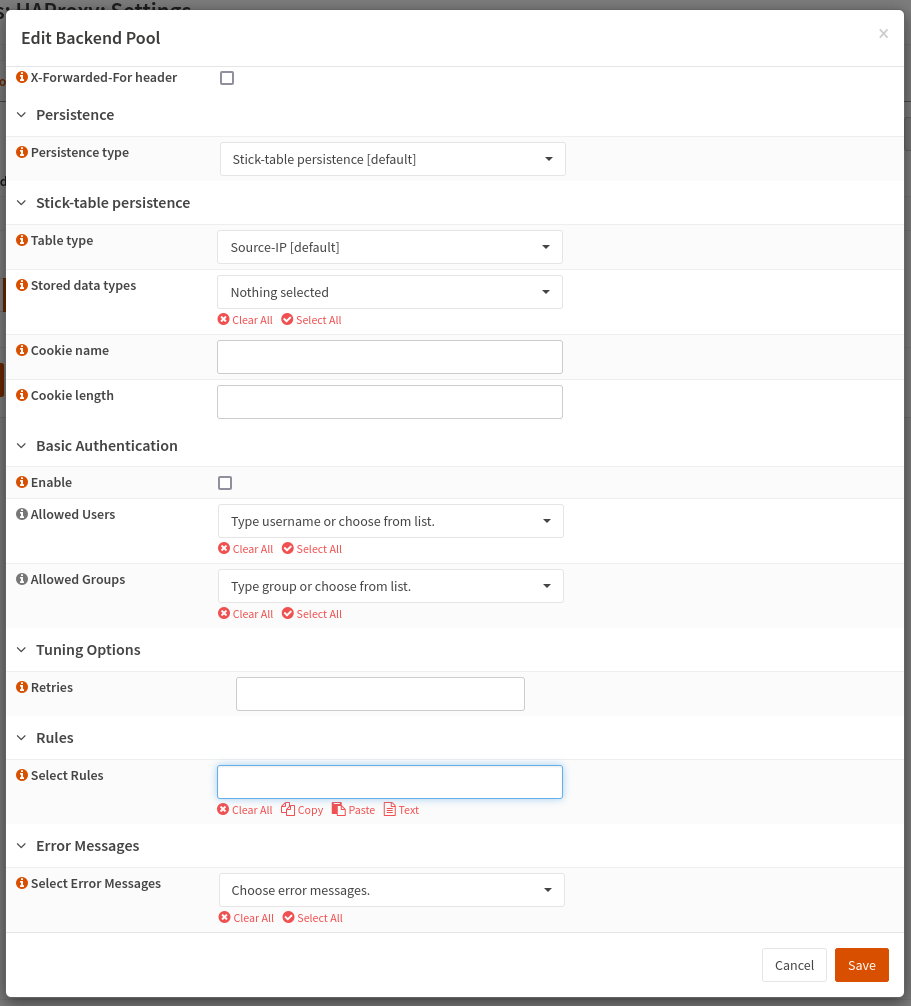
- Define a Virtual service->Backend Pool
- Name: anything you like
- Servers: The server you defined in the step 1 (remember to press TAB after entering server name)
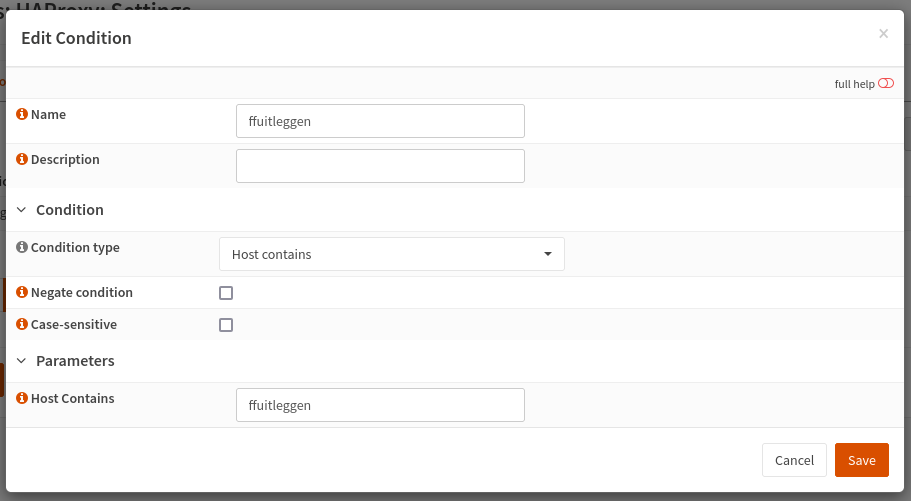
Step 2: Define a condition:
-
- Name: anything you like
- Condition: Host contains or you can use any other condition to match like Host matches and use the full url.
- Host string = Anything to recognize the URL or the full url in case of host matches.
- Name: anything you like
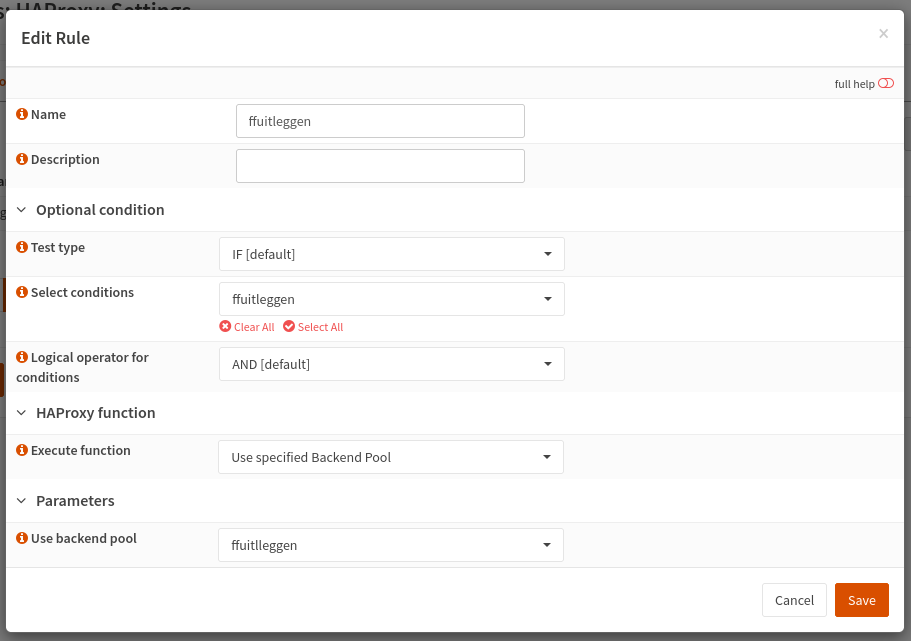
Step 3: Define a rule
- Name: anything you like
- Select Conditions: Select the webserver from the dropdown menu
- Under HAProxy function > Execute function: Use specified Backend Pool
- Use backend pool: Select the backend Pool from the drop down menu
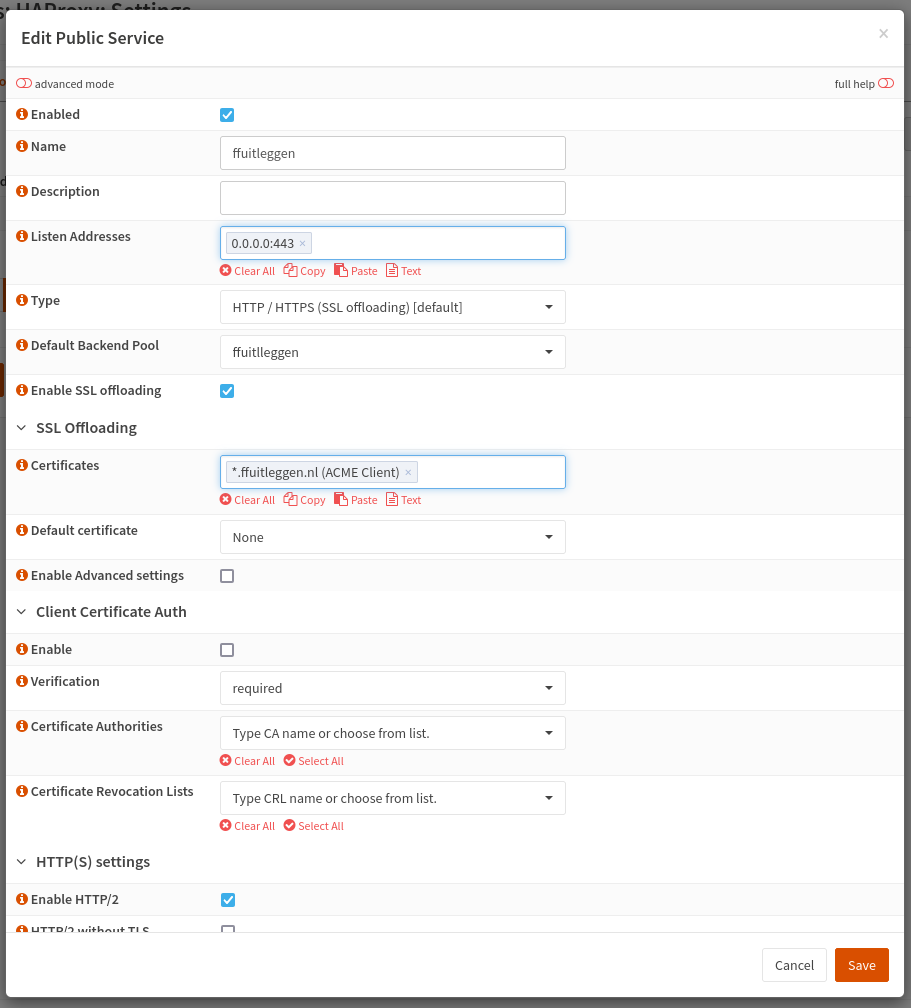
Step 4: Define a Virtual Service
Under Public Service:
- Name: anything you like
- Listen addresses: 0.0.0.0:443 (TAB)
- Enable SSL offloading: Checked
- Default backend pool: Select from dropdown menu (TAB)
- Certificate: your Let's Encrypt certificate
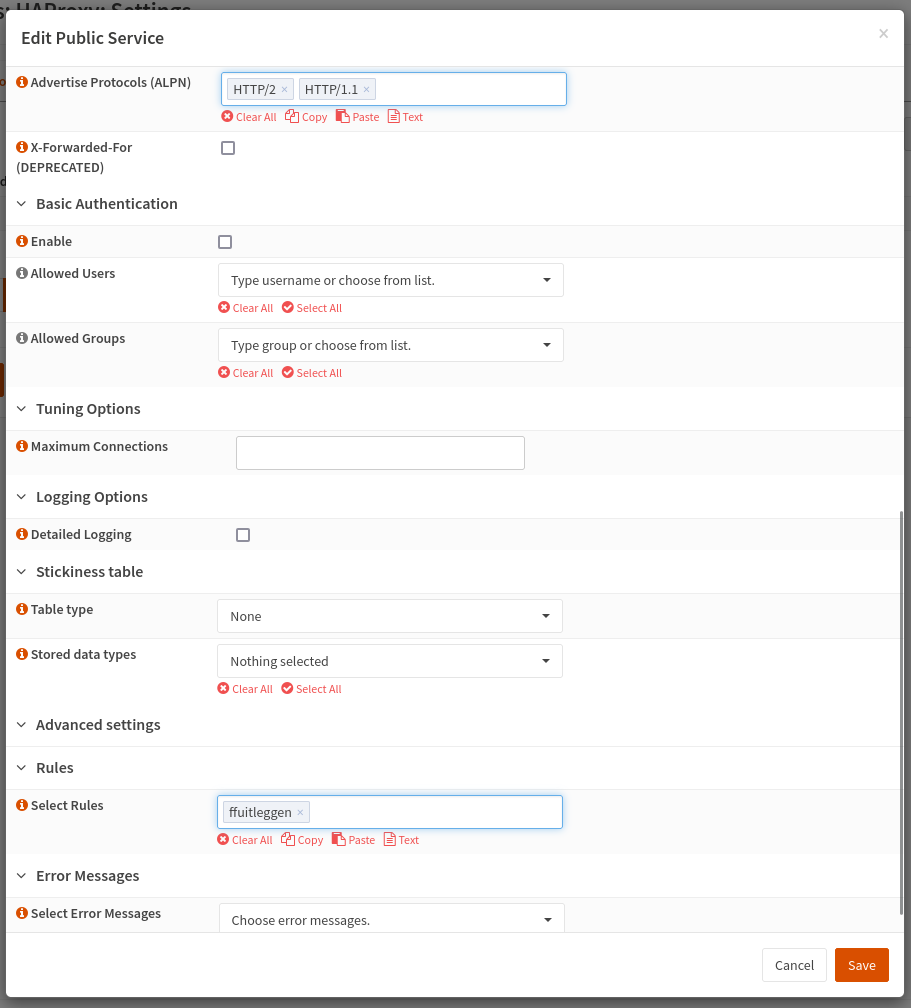
- Under Advanced settings:
- Select rules: The rule you made earlier
- Select rules: The rule you made earlier
Adguard Home communications error to 127.0.0.1#53: connection refused
When you cannot update OPNsense and you see an error in a SSH session when you try to run:
root@OPNsense:~ # dig @127.0.0.1 -p 53 google.com
dig @127.0.0.1 -p 53 google.comYou probably have a wrong binding in the Adguard config file.
To solve this issue:
nano AdGuardhome.yamlcd /usr/local/AdGuardHomeChange the bind (from a local ip address) to:
dns:
bind_hosts:
- 0.0.0.0
Then restart Adguard Home
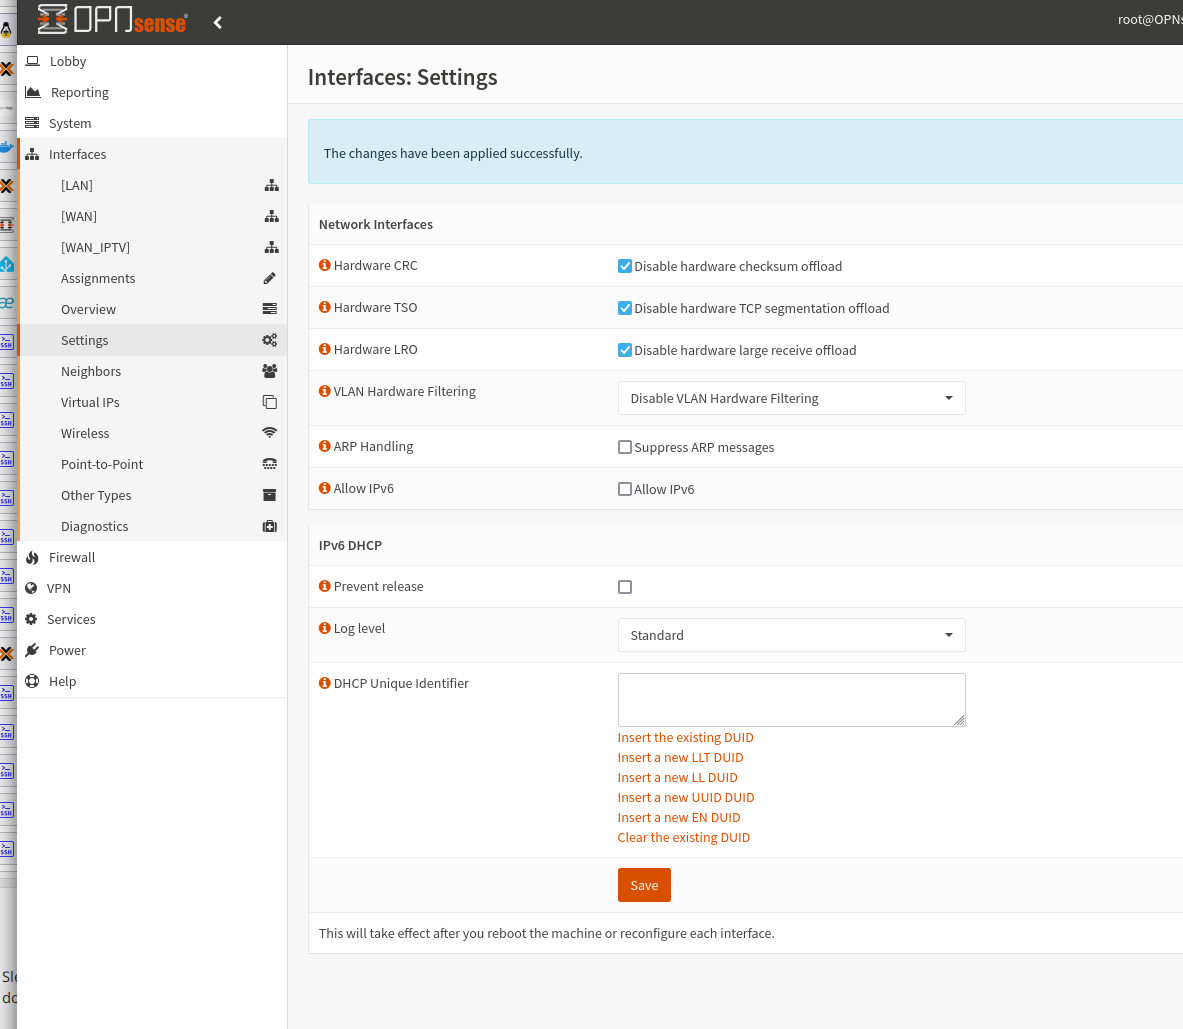
Disable IPv6 in OPNSense
Set IPv6 on all interfaces on ' None' and also remove the ' Allow IPv6' vinkje.
Remove also the ' Allow IPv6' rule in de firewall rules:
How to enable the HAProxy statistics page in OPNsense
Step 1: Edit Global Settings
In the left-hand menu, go to Services , select HAPproxy and then and then Settings.
-
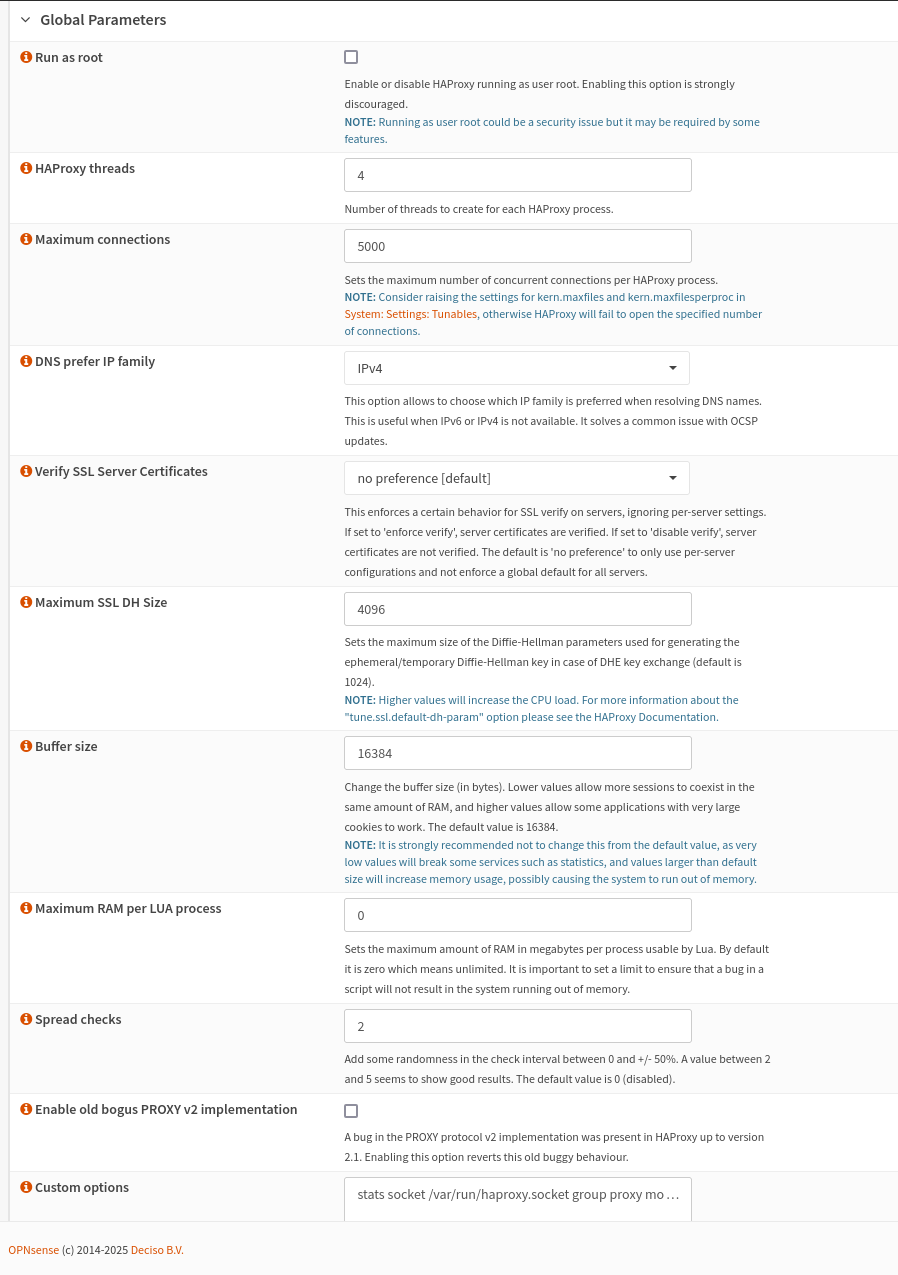
- Under the Settings tab, locate the Global Parameters
- Enable ' Advanced Mode' on the top left of the page
- Add or modify the following configuration line in the “Custom Options” field (on the bottom of the picture):
This enables a UNIX socket for administrative purposes.stats socket /var/run/haproxy.socket group proxy mode 775 level admin
Step 2: Configure Statistics in Frontend Settings
-
- Go to Virtual Servers in the Top menu
- Click the + sign and add a new Public Service: 'StatsFrontend'
- In this frontend, configure it as follows:
- Set Name: StatsFrontend
- Set Listen Adressess: set to local IP address of OPNsense (e.g. 192.168.2.1) with the default port 8822
- Set Type to default HTTP/HTTPS (SSL offloading) [default]
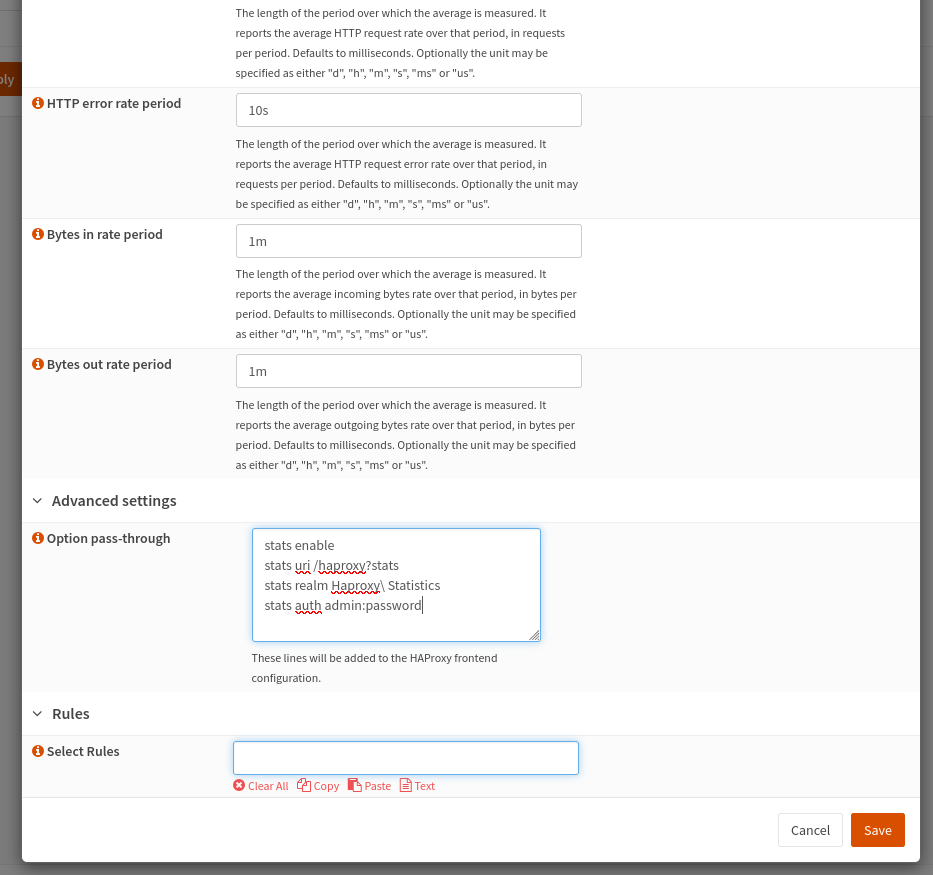
- Scroll all the way down to “Advanced Settings”, add these lines in the “Option Pass-through” field:
-
-
-
Replace admin with your desired username and password with a strong password.stats enable stats uri /haproxy?stats stats realm Haproxy\ Statistics stats auth admin:password123 - Click on “Save” and then apply changes by clicking on “Apply”.
-
-
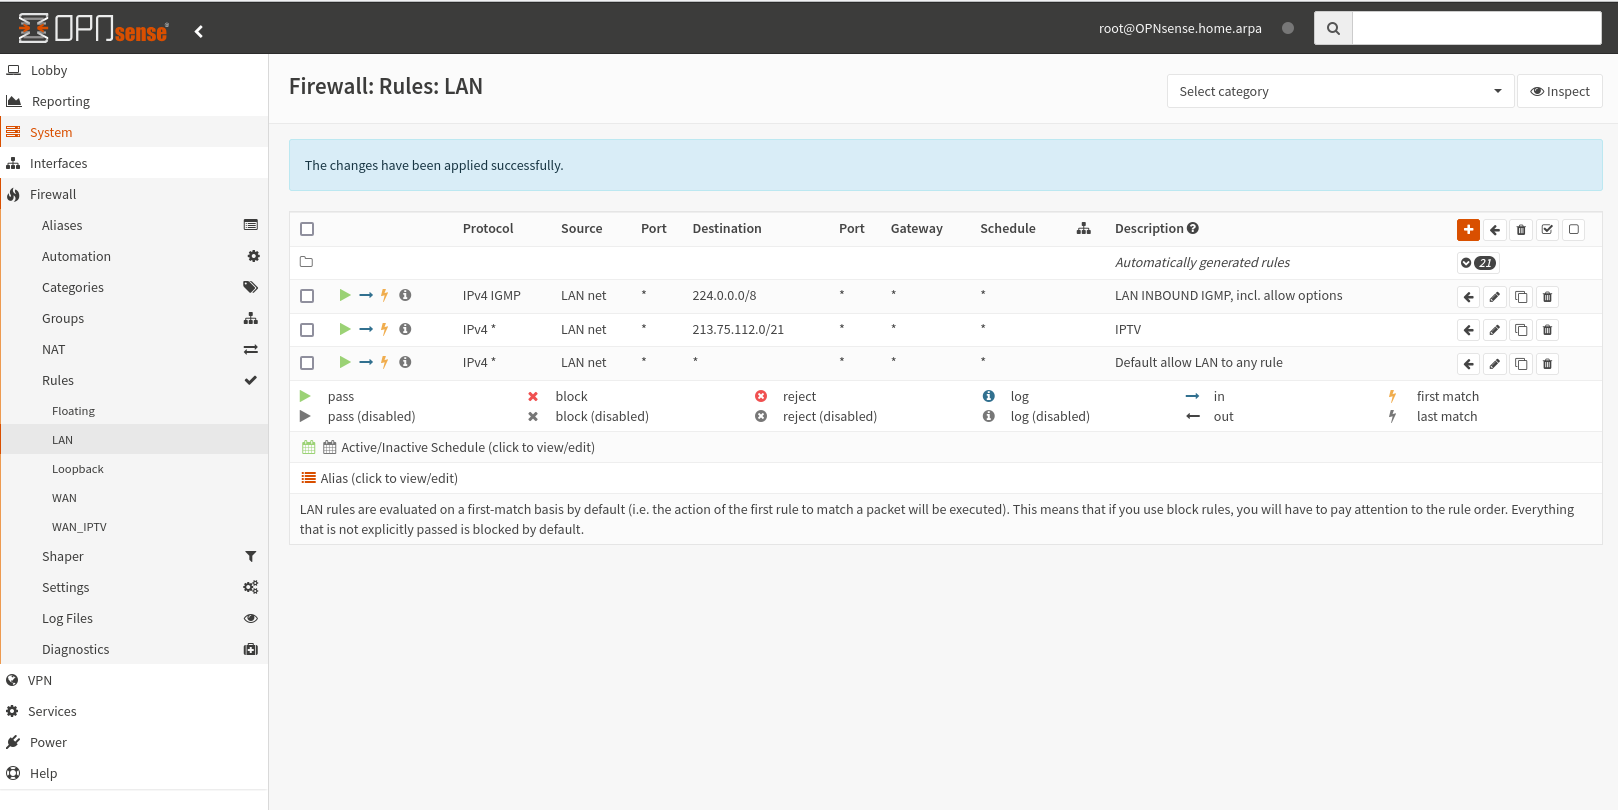
Step 3: Configure Firewall Rules
-
Allow Access to the Statistics Port:
- Navigate to Firewall > Rules > LAN
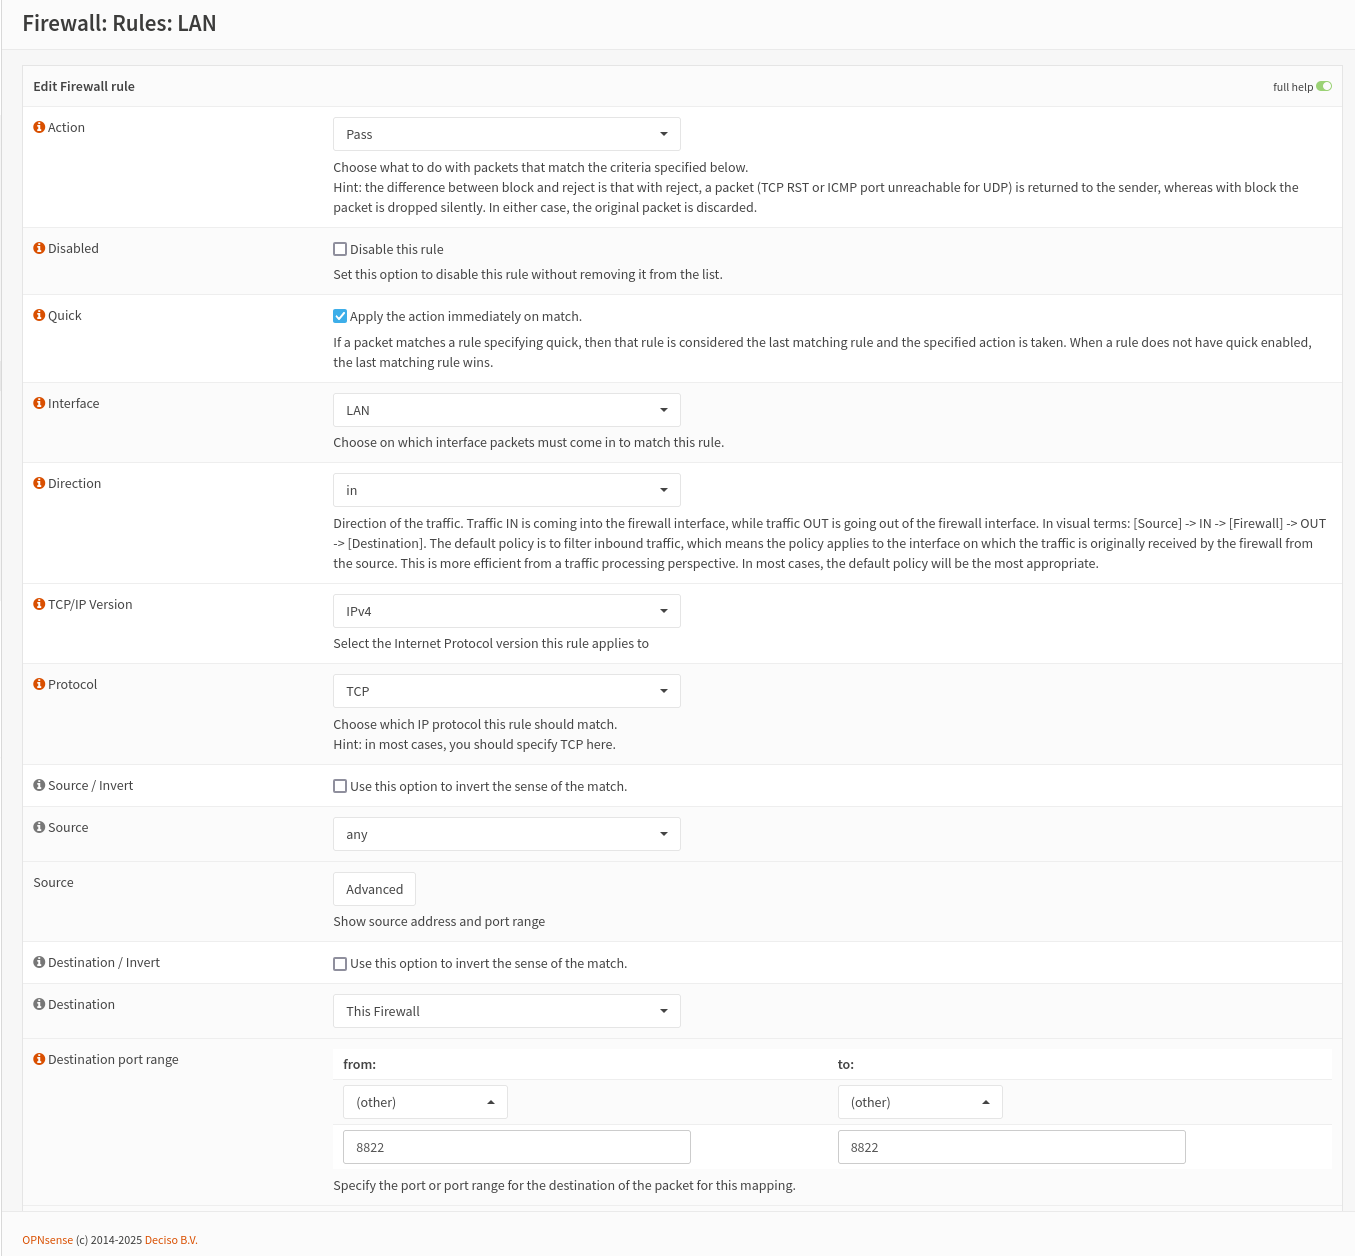
- Create a new rule with these parameters:
- Action: Pass
- Protocol: TCP
- Destination: This Firewall
- Destination Port Range: Other and the 8822
- Description: Access the Statistics page
- Leave everything else to the default values
- Save the rule and click on “Apply Changes”.
- Navigate to Firewall > Rules > LAN
Step 4: Test Access to the Statistics Page
- Open a web browser from a device allowed by your firewall rules.
- Enter the URL for accessing statistics, such as:
http://192.168.2.1:8822/haproxy?statsEnter the username and password you configured earlier when prompted.
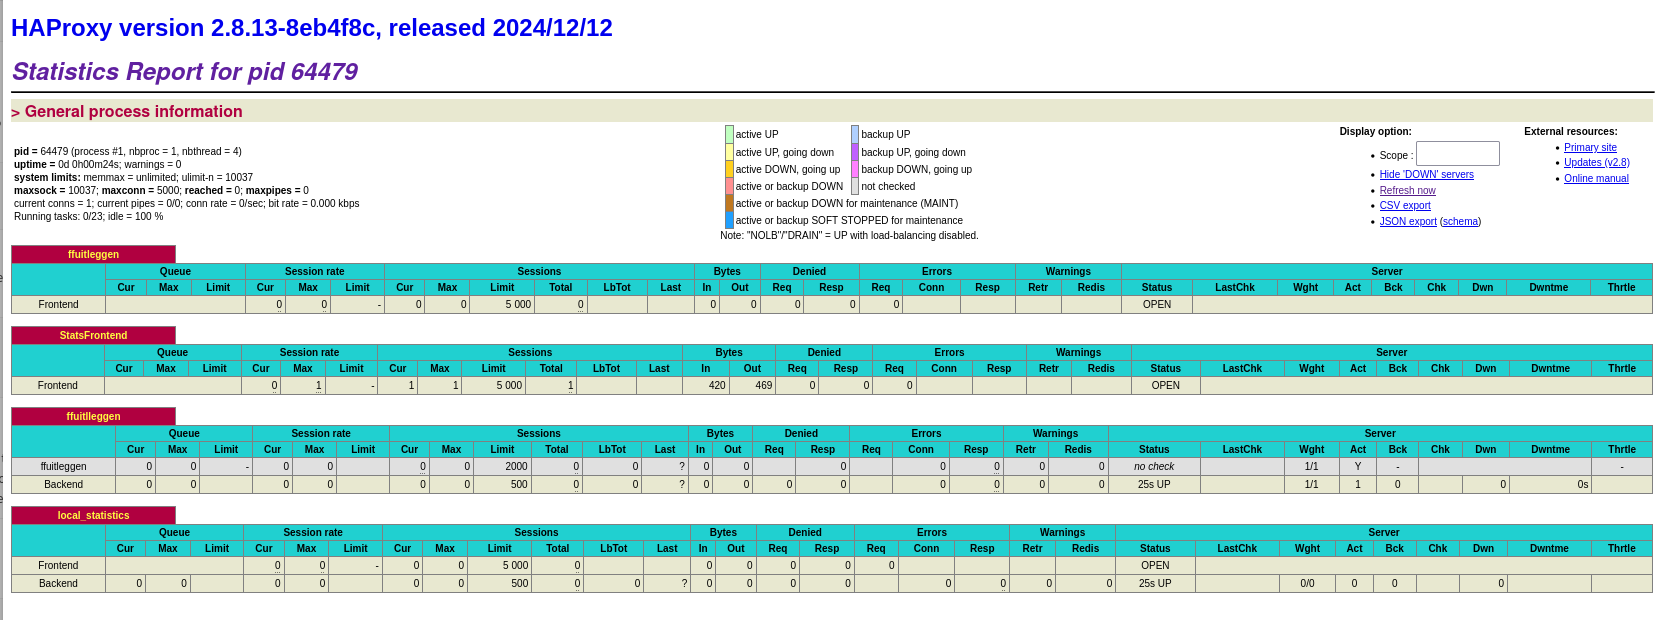
If everything is configured correctly, you should see HAProxy’s statistics page displaying real-time data about connections, backends, frontends, etc.
HowTo Restore a Google Drive backup file in OPNsense
A description on how to use Google Drive backup feature in OPNsense can be found here:
https://docs.opnsense.org/manual/how-tos/cloud_backup.html
But this is a rather complicated process, so read carefully!
You probably already know that you need a P12 key to store the backup files on Google Drive. Why is that?
The P12 key you created for use with Google Drive backups in OPNsense plays an important role in the authentication process between OPNsense and Google’s API. Here's exactly what the P12 key does during the backup and restore process:
1. What does the P12 key do?
The P12 key (a so-called PKCS#12 file) contains a private key that OPNsense uses to cryptographically authenticate itself as a service account to Google. It is linked to a Google Cloud service account that has access to your Google Drive.
In short:
-
Authentication
When creating a backup, OPNsense connects to the Google Drive API. -
Signing a JWT (JSON Web Token)
OPNsense generates a specially formatted token (JWT) and signs it with the private key from the P12 file. -
Token exchange with Google
The signed JWT is sent to Google’s OAuth 2.0 token endpoint, and in return, OPNsense receives an access token. -
Access to Google Drive
With that access token, OPNsense can upload or download files from Google Drive on behalf of the service account.
Why is this necessary?
Unlike user-based authentication (which uses a browser and interactive OAuth consent), this is a server-to-server authentication method. That’s ideal because OPNsense needs to perform automated backups without requiring manual login or user consent each time.
What happens during a restore?
During a restore:
-
OPNsense follows the same authentication process to access Google Drive.
-
It retrieves the list of XML backup files.
-
The user selects a file, and OPNsense downloads it via the API (authorized through the same token process).
Important security note
-
Treat the P12 file as a secret.
Anyone with access to this key — and who knows the associated service account — can access your backup files. -
Make sure only OPNsense (and you as the administrator) have access to this file.
2. How to restore a backup from Google Drive when using Linux?
With kio-Gdrive installed in Dolphin is not working because Google blocks this
That’s a known limitation of kio-gdrive in combination with Google’s stricter security policies. Google now blocks applications that are not verified or have not gone through OAuth validation, which applies to many open-source or locally installed apps like kio-gdrive.
Why does Google block kio-gdrive?
Google sees kio-gdrive as an "unverified app" requesting access to sensitive scopes (such as full access to your Drive). Because of that, Google refuses to complete the OAuth flow.
Solutions
1. Use rclone instead of kio-gdrive (recommended)
As mentioned earlier, rclone is the most robust and Google-compliant way to access Google Drive locally without running into OAuth issues. Rclone is recognized by Google, uses approved scopes, and just works.
➡️ Advantage: Stable and compatible with service accounts.
Installeren en instellen
Install rclone:
sudo apt install rcloneConfigure rclone for Google Drive:
rclone configChoose:
-
nto create a new remote configuration. -
Enter a name, for example:
gdrive. -
Choose option
13for Google Drive. -
Leave Client ID and Client Secret blank (or enter the values from your Google Cloud Console if you have them).
-
Select
"service_account_file"when prompted and provide the path to your.p12or.jsonfile.⚠️ Note:
rcloneworks best with JSON service account keys rather than P12.
If you only have a P12 key, you may first need to manually generate a JSON key via the Google Cloud Console.Because we use OPNsense, we have no choice but using a P12 key.
Verify your setup:
rclone ls gdrive:Download a backup file:
rclone copy gdrive:opnsense-backups/config-2025-05-28.xml .Upload the file via the OPNsense web interface:
Go to:System → Configuration → Backups → Restore → Upload the .xml file.
2. Create your own Google API project (advanced)
If you really want to keep using kio-gdrive (not recommended), then you’ll need to:
➡️ Google will still show a warning ("unverified app") and you’ll need to bypass it by clicking “Advanced” → “Proceed to...”.
⚠️ This is unstable and error-prone, especially if you use 2FA.
3. Download backups manually via your browser
This is the easiest method for occasional use: just log in to Google Drive via your browser and download the XML backup file manually. Because I have no need for frequent accessing the backup files I use this method and select the downloaded file under Restore:
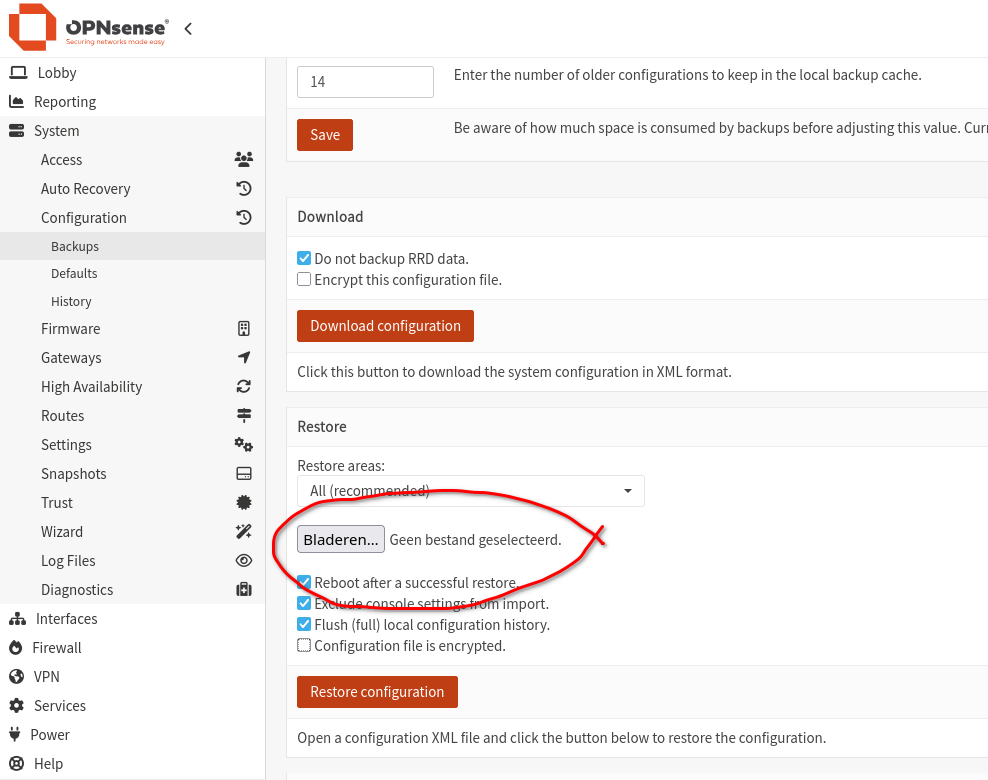
You don't need the P12 key to restore, because it is already known in OPNsense.
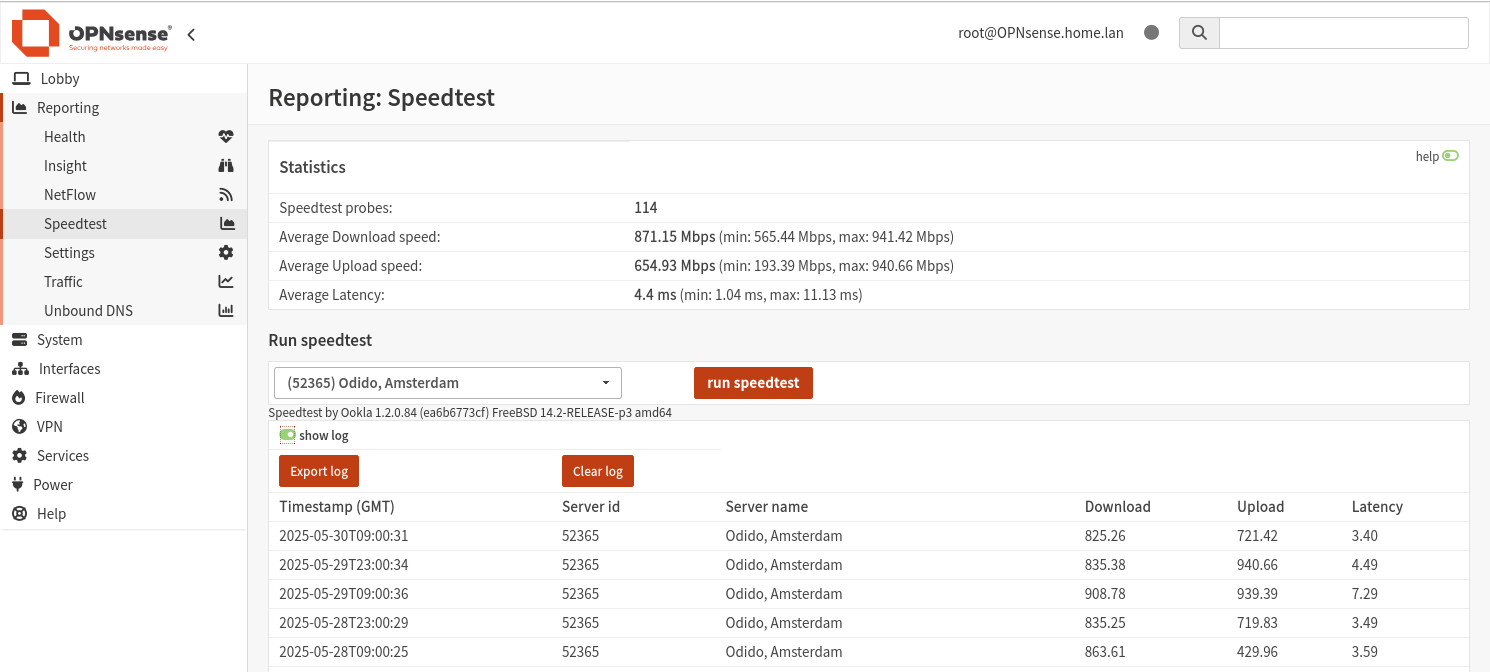
Run frequent Speedtest in OPNsense
To be able to use the Speedtest plugin, you need to install the Mimugmail repository:
https://github.com/mimugmail/opn-repo
Then go to System>Firmware>Plugins and install the 'os-speedtest-community' plugin in OPNsense.
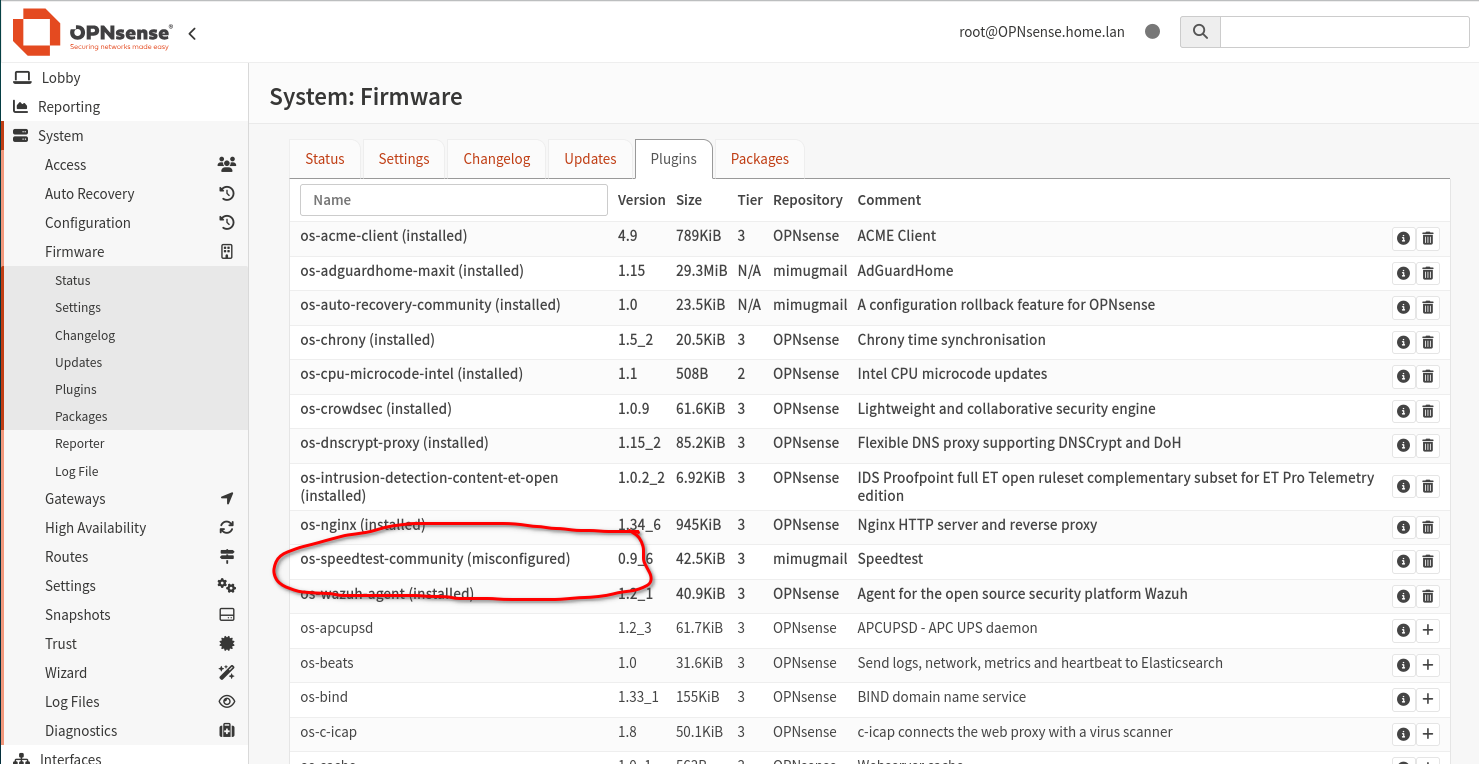
Yes, there is a "misconfigured" notice, but everything will work fine :-)
In OPNsense "Reporting > Speedtest", locate desired server and make note of server ID, (the numbers between the brackets in "(#####) Server Name")
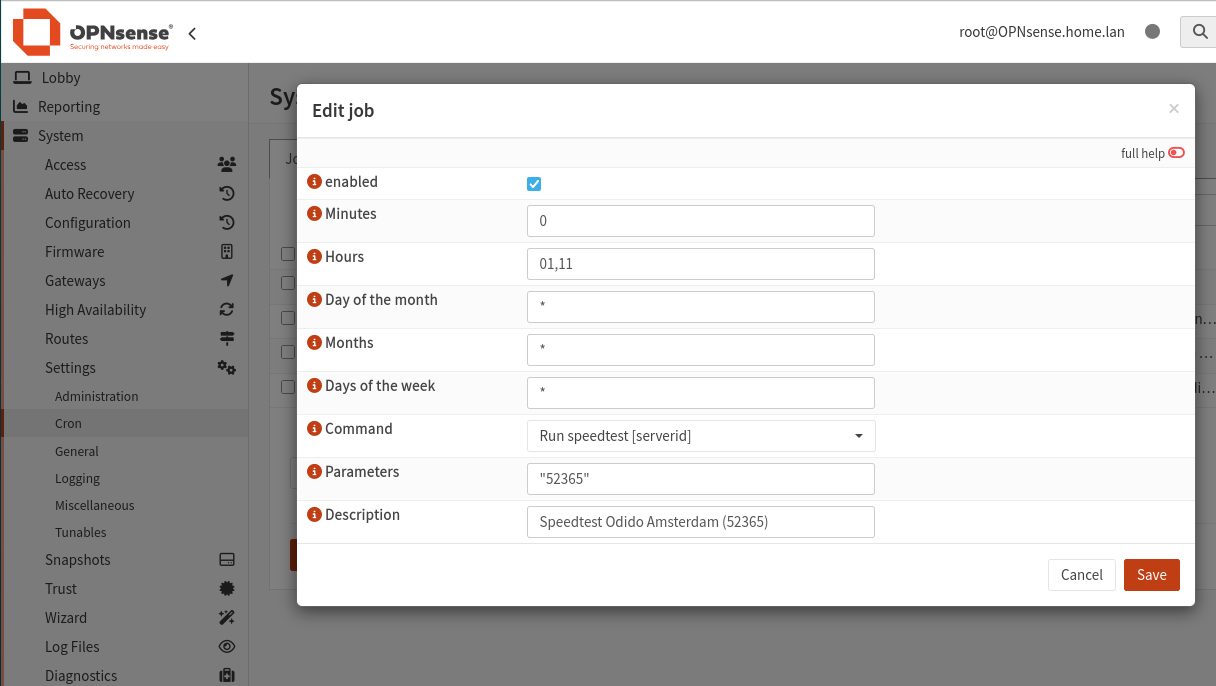
go to "System > Settings > Cron" create/edit the speedtest entry.
Set "Command" field to "Run speedtest [serverid]"
Set "Parameters" field to "#####" you dont need to append with "--server"... literally... just the numbers.
Under Reporting>Speedtest you can find the results. Just click on the little "show log" switch.

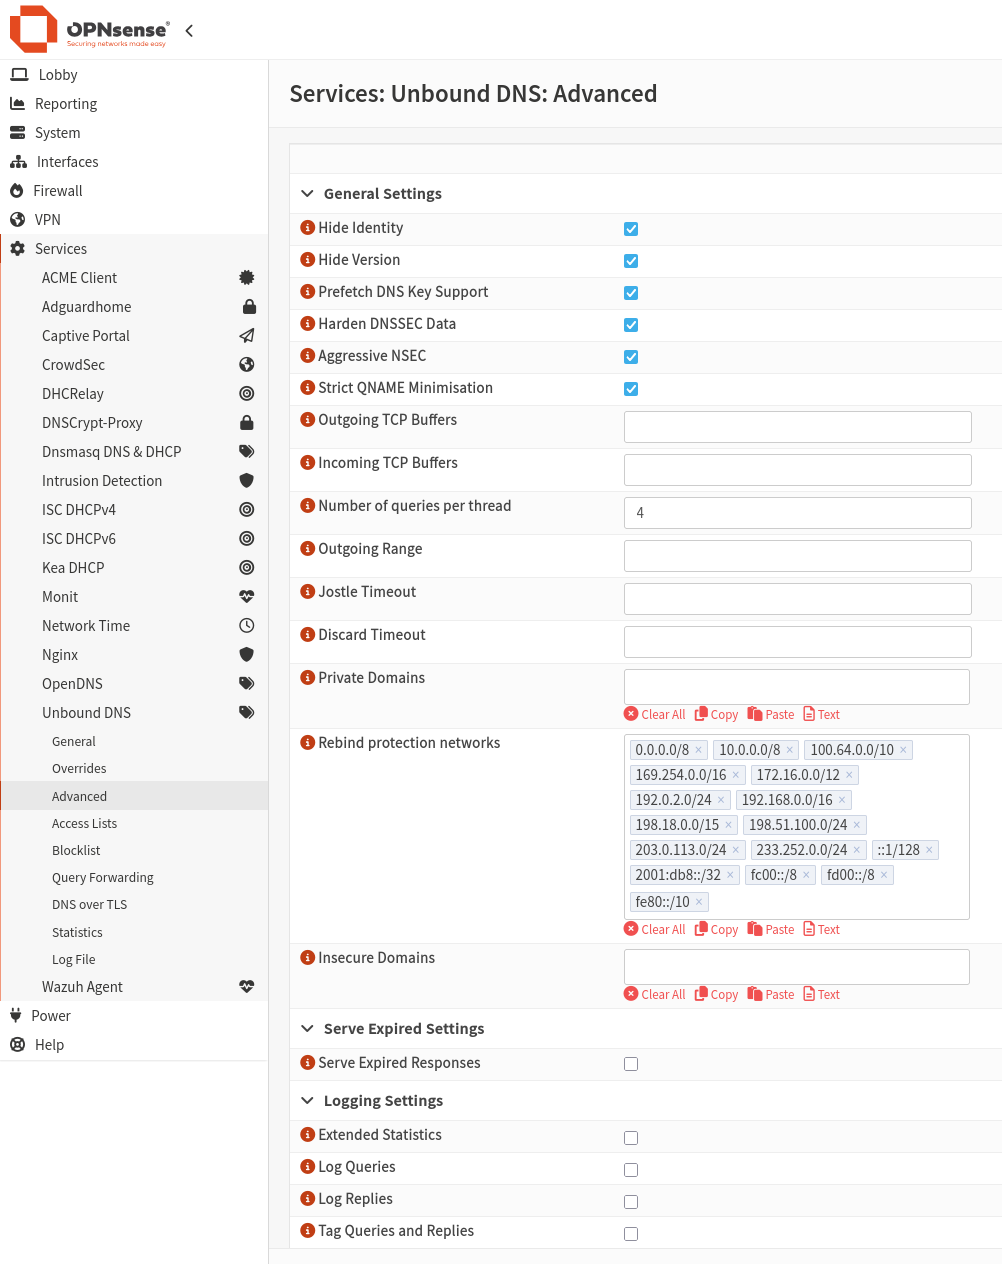
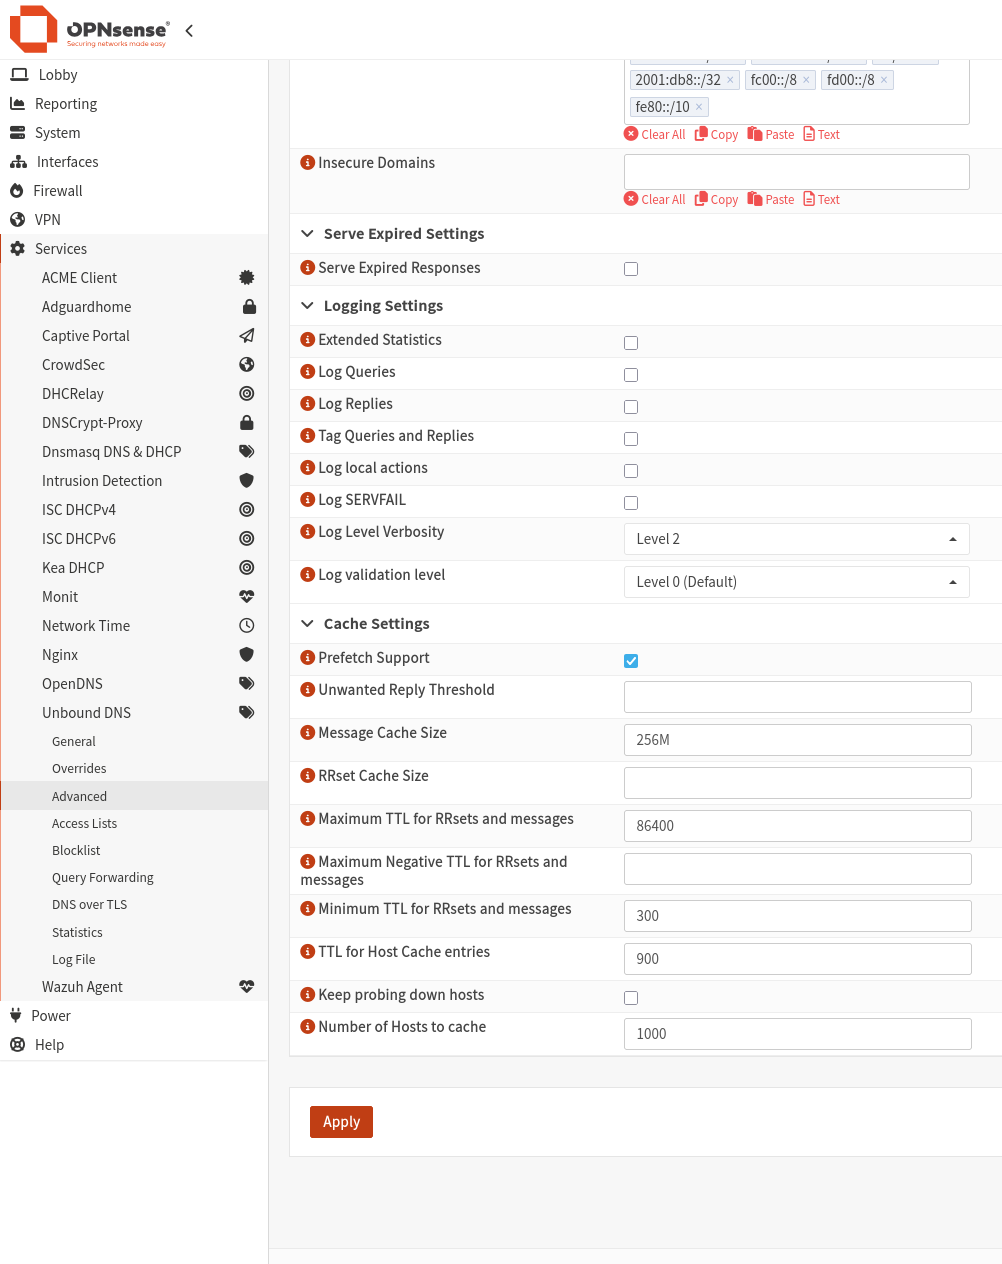
Voorgestelde waarden voor Advanced tab in Unbound
Screenshots staan onderaan deze post.
Basisinstellingen voor privacy en veiligheid:
Prestatiesettings:
Cachinginstellingen:
Logginginstellingen:
Diverse instellingen:
Aanbevolen instellingen (samenvatting):
Door deze instellingen zorgvuldig af te stemmen, kun je de prestaties, privacy en veiligheid van je DNS-resolutie optimaliseren.
Setup os-ddclient for when external IP address changes
Here's a step-by-step guide in English on how to configure os-ddclient in OPNsense to automatically update your Cloudflare DNS records when your external IP address changes (e.g., from your ISP).
If you get the concept of this then you should be able to do this for DuckDNS or Dynu DNS or one of the other options in a similar way.
Prerequisites
Before you begin:
-
You need a Cloudflare account.
-
You need a domain managed by Cloudflare.
-
You should have your Cloudflare API token or API key (Token is preferred for security).
-
os-ddclientmust be installed and enabled in OPNsense (System > Firmware > Plugins> installos-ddclient).
Step-by-step Configuration
1. Enable os-ddclient
Go to:
-
Services > Dynamic DNS > Settings -
Check Enable
-
Click Save
2. Add a Dynamic DNS Account
Go to:
-
Services > Dynamic DNS > Accounts -
Click ➕ Add
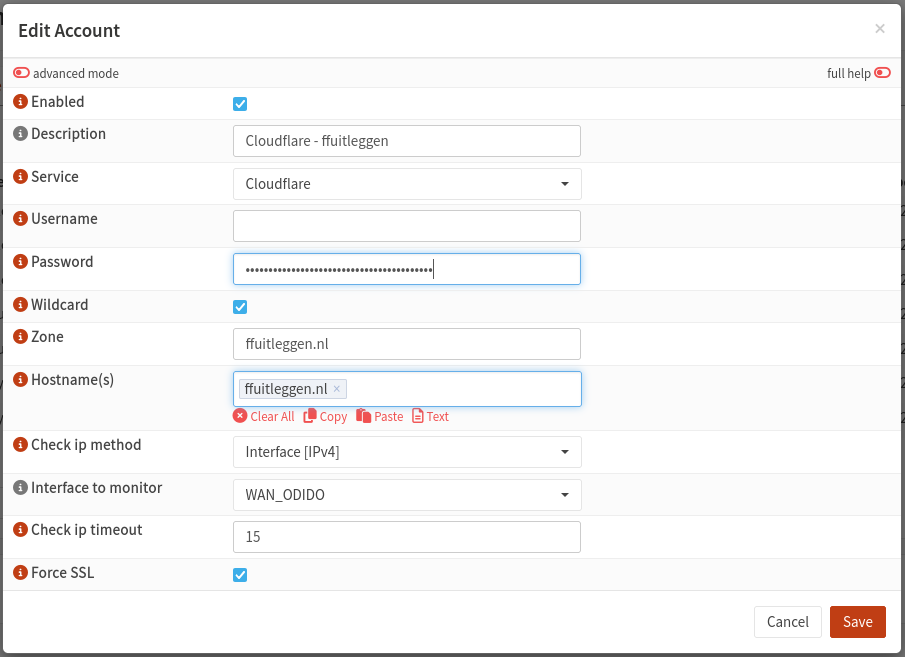
Now fill in the required fields:
General Settings
-
Enabled: ✅
-
Description: e.g.,
Cloudflare mydomain.com -
Service:
cloudflare
Cloudflare API Credentials
You have two options: API Token (preferred) or Global API Key.
If you're using an API Token:
-
Username: leave blank >>there are problem reported when this is filled in and you are using the API key method.
-
Password: paste your API Token
-
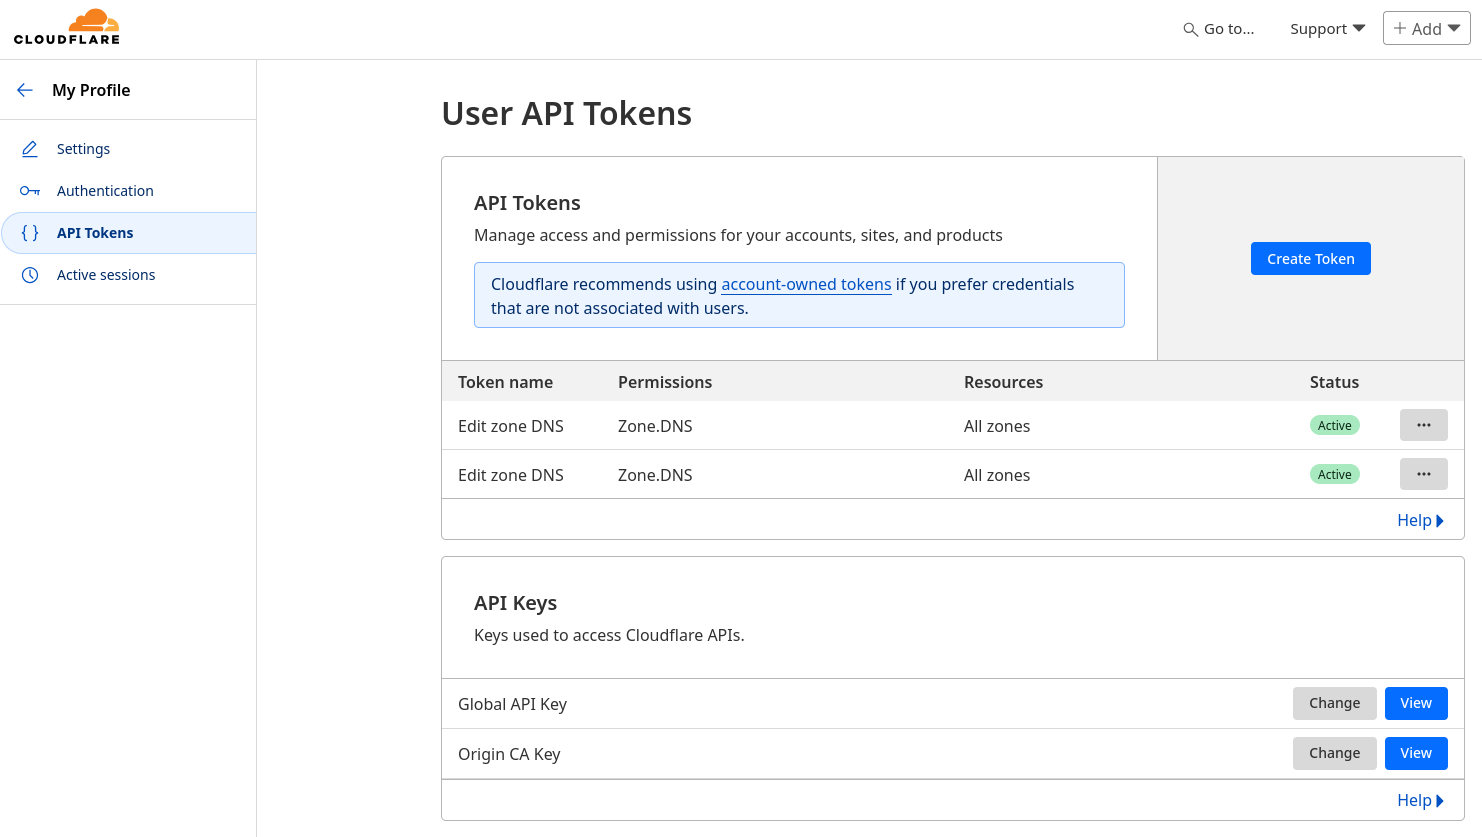
Make sure your API token has permission to:
-
Zone: DNS → Edit
-
Zone: Zone → Read
-
I have made a new API token. When logged in on Cloudflare, go to the top right and click on Profile . Then go to {} API Tokens and add a new token for "Edit zone DNS". Save the token on a safe place.
If you're using a Global API Key:
-
Username / Email: your Cloudflare account email
-
Password: your Global API Key
The use of the Global API key for this is not recommended!
Hostname Details
- Wildcard: usually unchecked unless you want
*.home.example.comupdated too - Zone: your domain name (e.g.,
example.com) -
Hostname(s): the DNS record(s) you want to update (e.g.,
home.example.com) >>when the same API key is used then you can add multiple domain names here.
IP Settings
-
Check IP Method:
Interface(or useWebfor online IP detection) -
Interface to monitor:
WAN - Check ip timeout:
10>> default value in minutes. Leave it as it is. -
Force SSL: ✅ (recommended)
Click Save, then Apply.
Test the Setup
-
After saving, go to the
Services > Dynamic DNS > Log File. -
Click Run now next to your entry to test it.
-
Check the log to see if the IP update succeeded.
Done!
Your OPNsense box will now monitor your WAN IP and automatically update your Cloudflare DNS A or AAAA record whenever your public IP changes.